I've owned my Jankowski cymbala long enough to have some ideas of what I want in an
instrument. Smaller. Lighter. A wider range. Brass strings. Wound bass.
My basic body construction plans are based on Sam Rizzetta's Smithsonian article on Hammer Dulcimer building. Sam's plans seems to be the most forgiving of amateur woodworking skills.
For tuning design, I will carefully say it's based somewhat on Kurt Bjorling's design. I say "somewhat" because I had a lovely long conversation with him about tuning layout, but have never seen how he executes it. So I don't want anyone to come to think this represents Kurt's thinking on this - it's my interpretation of my understanding of his thinking. I have heard wonderful things about his work - I can't claim to represent it, just to attempt to copy some aspects of it. He might be horrified by my scale. My construction. Any number of details. (In fact, if you read down the page, you will find he was concerned about some construction details - and was kind enough to give me advice).
I started collecting materials in 2002. Got some nice maple (jeeze, the stuff is hard - breaks my saw, breaks my drill...) on eBay. Found out it's worth the trip to Dyke's Lumber for birch plywood, screw Home Depot. Cheap rebuilt table saw - was going to try and get away with my hand held circular - thankfully I got over that fantasy. And a small, rebuilt drill press. Actually, I might have managed without that. And clamps. And glue.
I also got some one over size piano tuning pins on eBay. Ended up not using them. Damn things are heavy. So what if they were cheap, zither pins can be had for 30 cents each. The schleppage factor is a concern! I've been hauling this Jankowski around. The Jankowskis were furniture makers before the war. Good, heavy, European furniture. No subway for that baby.
I bought a bunch of brass wire in various gauges. Wrapped them up on an old busted mountain dulcimer to experiment with gauge/tension/pitch/timber issues. Also got a whole bass set for a Kimball console piano on - yes, eBay. Hope I can use those in the sub bass. (Later - Kurt suggests that the piano strings are unrealistic. Oh well. Not the first time I've ended up with parts I don't end up using. Maybe I will save these for a "bass tsimbl",).
Finally, after a year of the "slow meticulous(?) accumulation of resources and ideas", the scary day came - it was time to cut wood (mid June, 2003).
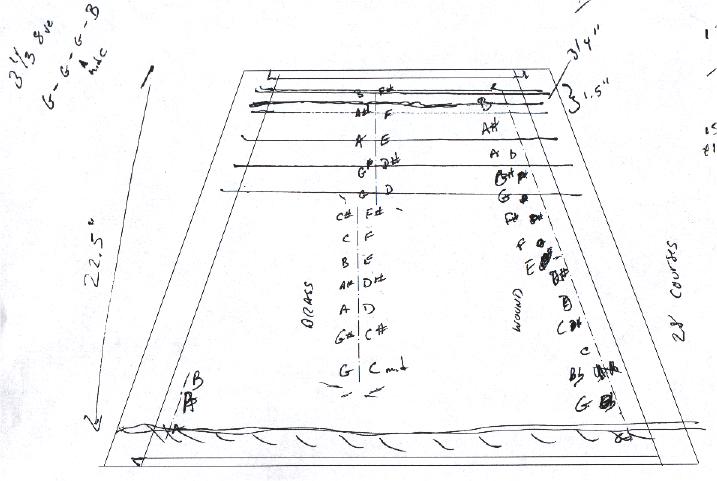
The plans, such as they are. The range runs from the second G below middle C
to the second B above middle C, a range of 3 and a third octaves.
There are 4 sections. A sub bass, at the bottom of the instrument, below all other courses, alternating the low G, A Bb, B.
Above that on the right, the bass bridge, chromatic from the C to the B below middle C. On the left, a treble bridge dividing the strings into the fifth, middle C to F# on the right side and G to C# on the higher, left side. And above that an altissimo bridge divided at the fourth instead of the fifth, high D to F3 on the right and G to B on the left.
Warning! It would be foolhardy to follow along and build this yourself without getting to the "six months later" section - look for it about Jan 2004. There have already been a few points where I stopped, backed up, and undid/redid something. There is a point about a dozen pictures down where I finish a satisfiying day of work and design and then two days later rip it out on the advice of a more experienced person! Which is kinda neat, actually, to get long distance corrections.
My work style is largely intuitive. I do try to do the math and be as careful and scientific as I can, but there are others whose minds are better at that. This thing I'm kind of making up as I go along. Sometimes this leads to lovely bits of brilliance, other times it leads to serious errors, which, once they are pointed out by a more orderly mind, are perfectly obvious.
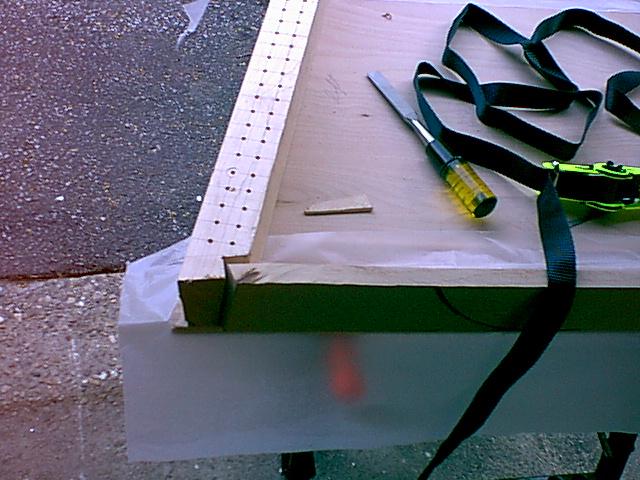
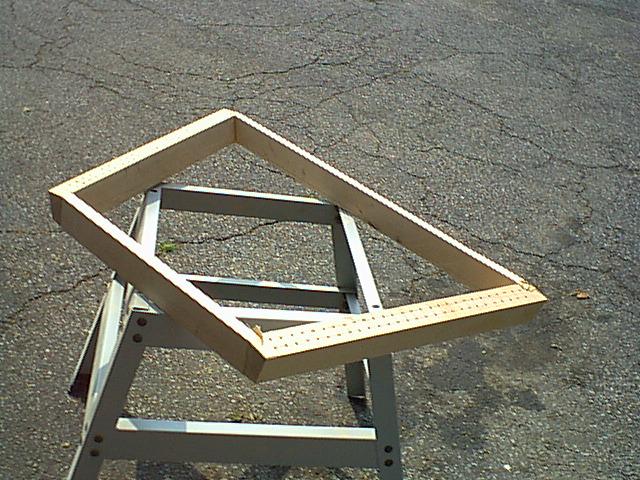
Pin blocks and rails cut from solid maple, drilled, and ready for joining.
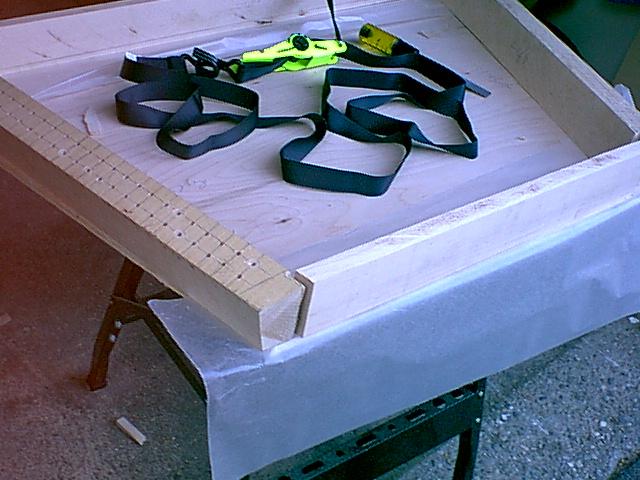
Blocks and rails glued, clamped with tie down ratchet. Right, result.
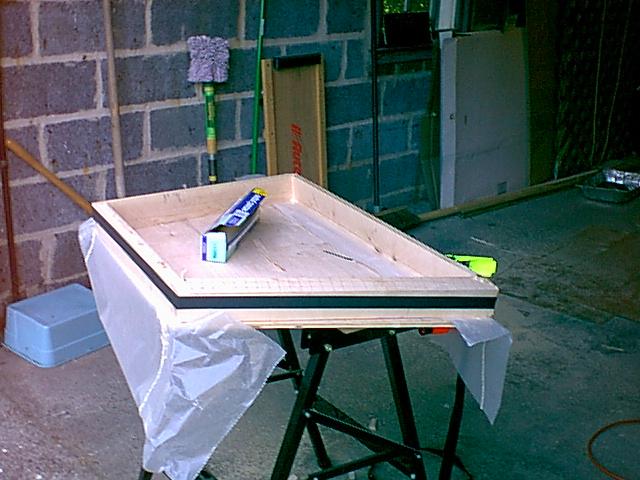
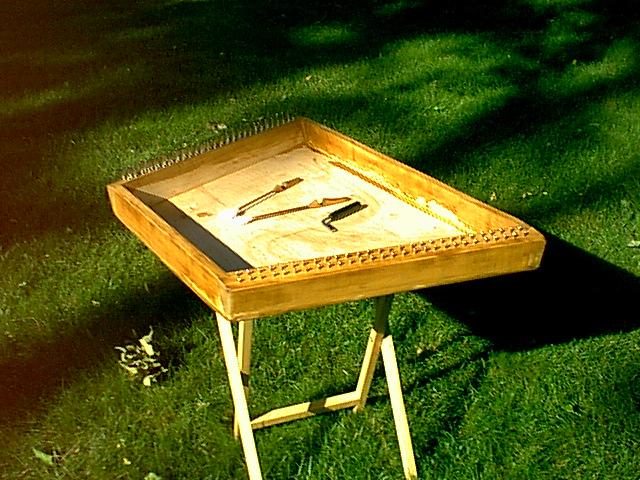
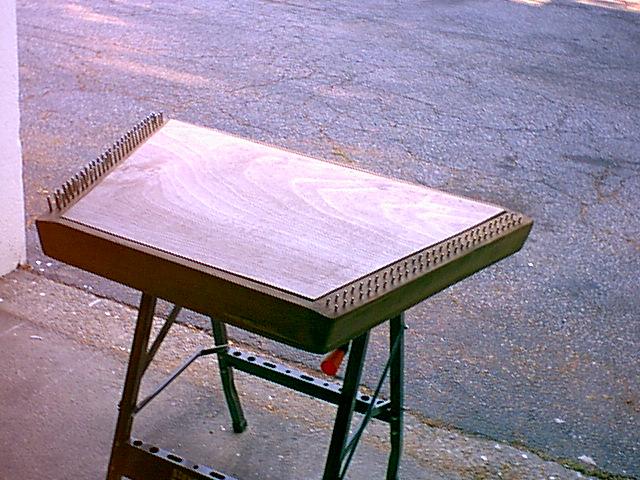
Glueing the frame to the back, clamped with the weight of 1941 Plymouth wheels. Right, the completed box, stained, with the hitch pins and tuning pins installed in the afternoon sun off the Hudson River, on July 6, 2003.
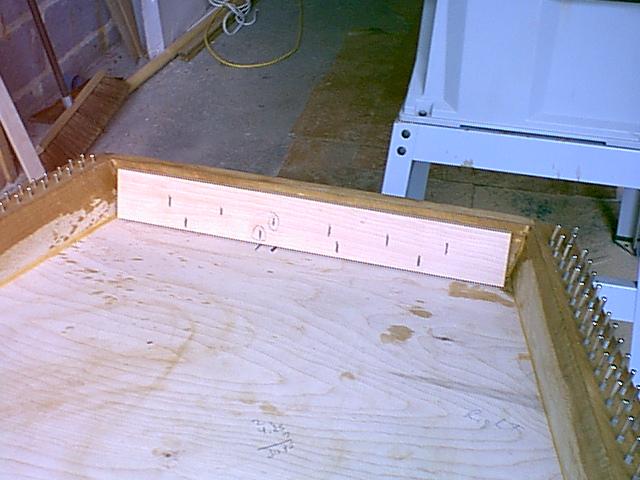
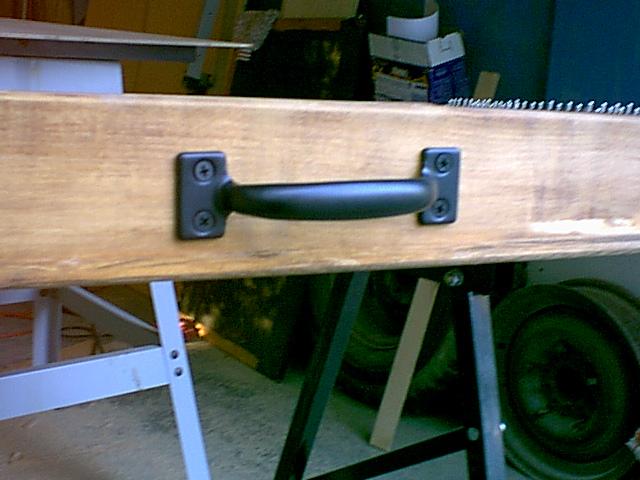
Left, marks dividing the top rail into fifths (so a bridge can be placed at the 2:3 position to make a fifth) and into sevenths (so a bridge can be placed at the 3:4 position to make a fourth). Right, for portablity, a handle is added now that we are far enought along to know where it balances.
Left, the soundboard has been cut. No fancy wood, a piece of 1/4 inch plywood I had handy. I will stain this black for contrast with the strings. Right, the scene of the crime the Hackbretters Bret HackinPlace. This shows the first brace attempt - bad - see Kurt's comments! These braces were removed and replaced.
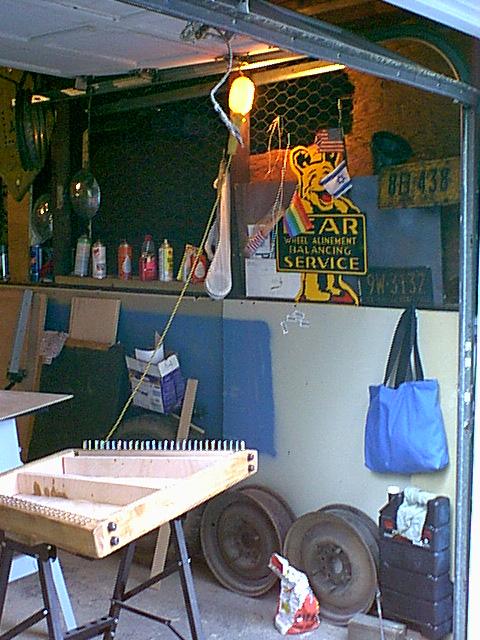
I live in a townhouse coop and the garage is part of a row. Mostly I keep my 1941 Plymouth Special DeLuxe in there. When tsimbl working day comes (Sunday) I back out the car, park it somewhere, move the pan that catches the leaking oil, and take down the table saw and benches. I transform the space into a workshop. At the end of the day, the workshop gets stored back into the 2.5 feet at the front of the garage that the Plymouth can spare, and all is swept out and the car goes back in.
Kurt Bjorling saw the work up to this point - which included some ideas about bracing that were based on some erroneous thinking - and kindly wrote:
I am sure that these bridge supports are gross overkill - you can cut those
to 1/4 their present size and they will serve admirably.
My bridge braces are between
1/2 and 3/4 inch thick and 3/4 inch wide. They more than support the
downward pressure. They are supported, in turn, by the ribs on which they
sit and the front and back rails. There are two ribs between the rails and
the whole thing is about 20 inches front-to-back, so I guess there's about 6
inches or so between one rib and the next to hold up the bridge supports.
ON THE OTHER HAND - my pin blocks are 4 inches wide, made of heavy laminated
maple piano pinplank material 1.5 inches thick and they are glued with
boatmakers epoxy to a bottom board which is 3/8 inch thick, yet they arch
inward more than 1/8 of an inch at the middle due to the string tension. OF
course, being rigidly glued to the back and supported to their full height
by the fron and back rails, this means that they are twisting inward as well
as bowed inward on their top surfaces. (It's quite impressive!)
Based on this and what I can understand from your description I am pretty
sure you need to worry more about horizontal string pressure and less about
vertical pressure. Just draw a picture and do a little vector pressure
calculation and I think you'll get it. Or, to look at it from the other end
of the argument, IF the downward pressure (X) is so great that you must
support it, wht must the horizontal pressure (Y) be?!! Y is probably about
10 times X.
I think you need to:
1. make the soundboard supports which run along the rails go ALL the way to
the pin blocks and fit them very snug, especially at the upper edges of the
pin blocks. The fact that your pin blocks are cut away to accomodate the
rails means you have a risk of the blocks splitting and the support of the
inner rails will help avoid this.
2. Add two or three horizontal ribs that are AT LEAST 2/3 of the height up
from the bottom board to the soundboard - the taller the better for obvious
mechanical reasons. The bridge supports can sit on these and on the inner
rails. If you want the bridge supports thicker than this allows, cut them
to fit over the ribs, not the other way around. If you fear this weakens
them then add little trestle blocks on each side of the ribs where the
bridge supports cross them.
3. Don't worry about weight - I think you can see that if you do this right
you will remove about as much wood from the bridges as you are adding to
make two ribs!
-- Kurt Bjorling, July 2003, used by permission
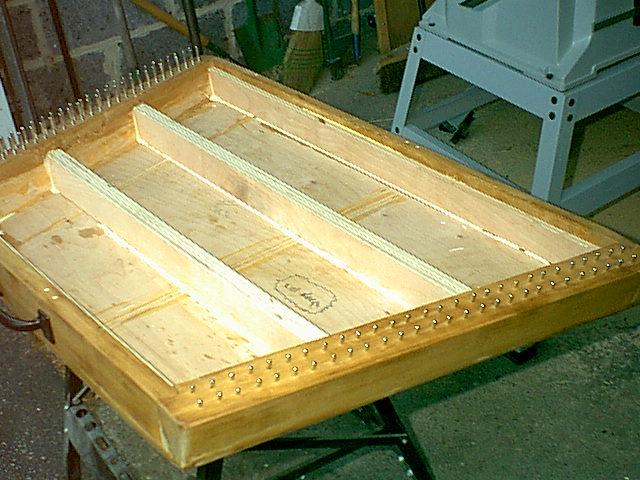
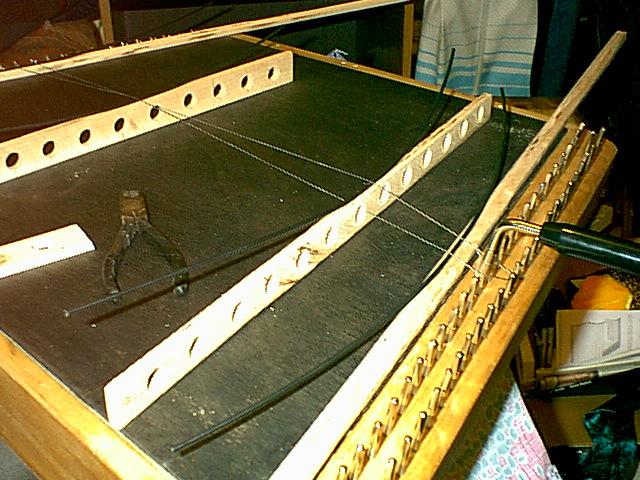
After I knocked my first, poor brace design out, I did it this way. There are
four horizintal braces 3/4 inch thick, cut tightly enough to the pinblocks that they needed a bit of mallet tapping to wedge them in. Thier primary job is to keep the pinblocks from ripping apart, spliting, or pulling free. The secondary purpose is to support the rather lightweight vertical strips that brace the bridges. By the way, I made little marks with the drill on the rails so I can have a reference to help align the bridges once the soundboard is on.
Four bridges go between the sides - the short one on the left to support two of the subbass strings, the next to the right being the 3/2 (fifth) bridge for the majority of the treble bridge, slightly to its right
the 4/3 bridge (fourth) for the altissimo on the top strings, and on the right the big daddy, full height, bass bridge.
There are two more bridges - on each end by the pinblocks.
I ordered delrin rod from Musicmakers Kits - it's available many other places. This is what will sit on top of the bridge and fret the string.
Remembering that my soundboard is flush with the pinblocks (instead of recessed, maybe not such a good idea) I need a rise of 1/4 to 3/8 inch at the sides of the soundboard to make the outer ends of the strings.
The inner bridges are one inch on the bass side and the short extra one for the sub-bass, and at 1.25 inches for the treble bridges (3/2 and 4/3). The inner bridges are 1/4 inch thick, with a channel cut into the peak to lay the rod into. Cutting the bridges was one of the most dificult parts. It is the first time in this project I have wasted more wood than I used. These are small, fussy parts. The table saw is too macho for it. A "Dremel table saw" would have been better. I used a 5/8" wood boring bit to make holes where strings pass through bridges.
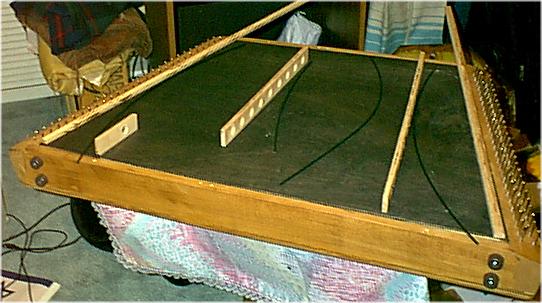
I glued in my makers mark - which won't be seen since I don't plan on soundholes, and stained the soundboard with black shoe polish - an old organ maker's trick. It does not seal the wood, so it is less likely to split. Black for good contrast with the brass strings.
This was a happy moment. That is not music wire there, but some cheap stuff that handles a lot like music wire. It is there to hold the braces in place, to see if my plans are right - that the wires go over and under the bridges without hanging up anywhere. And they do!
Plus, one of them is under enough tension to make a musical sound - so I plunked it: the tsimbl speaks!
The brass strings, by the way, are from The Instrument Workshop, run by Lutz Baumgart. He has a tremendous selection, good prices, and is nice to deal with. Based on latest work - I now have a few real strings on it - I will be using 36 gauge in the subbass, 36 and 28.5 in the bass, 22.5 in the treble, and 20 in the altissimo. They are the regular commercial brass spring wire. It took me a few tries to get a good double
helix loop at the bottom that would not just pull out under stress.
Ha ha - forget about 20 gauge brass in altisimo. It needs steel! Brass can't
hack that tension. Period. So I reused some of the steel off the Jankoski!
Anyhow, after several bandage filled days - and a lot of startle responses
everytime a string broke or a bridge flopped over. My bridges stink. They work, but I'd do them different in the theoretical next time - all kinds of shimming to get them to stand up straight. Still, once the REAL pressure was on, and the strings were all there under full tension, they settled down.
August 10, 2003
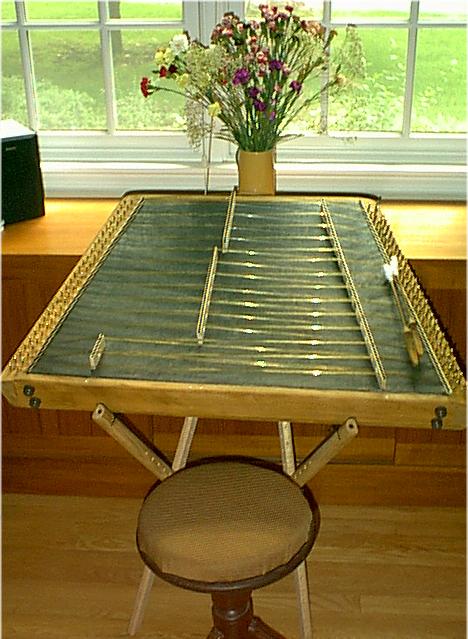
I'm now in the endless retuning segment, where as soon as you've tuned the whole thing, you can go back to the beginning and start again. Still, it's now close enough to temporarily stable (it was tuned about a dozen times over 18 hours) that I was able to take some samples of how it sounds - keep in mind that tuning is still pretty iffy at this point.
Nothing - other than a few strings - has exploded yet. No seams - knock wood - are seperating. And I'm so glad I put a handle on it. And the tunign is settling down enough that it can be played. A jam session was held in its honor
on Sunday afternoon, August 10. Thanks to all who came.
SOUNDFILES
Got a nice note from Josh Horowitz, who has given me the benefit of his
thoughts on design over the past few years as this project became a gleam.
He said
I guess its superfluous at this point to notice that the base of the bridge is too narrow for the top.
It's not superfluous at all, and confirms what I suspected. Probably
in the not too distant future I will replace the bridges. The problem
is they should be wider at the base than at the top, not like these planks
that look like rulers on edge. They are already twisting, and kept flopping over when I was stringing.
FIVE MONTHS LATER....
Winter is upon us, the second snowstorm of the season. So we've moved from
the humidity of summer in the NorthEast to the awful bloody nosed dryness
of winter in the NorthEast.
I am cautiously happy to report that the new tsimbl is doing well! The tuning settled down within about 10 days and mostly I only retune in response
to weather - that is, the pitch has gone up or down, but consistantly
accross the strings. I would mention that there is no sign of splitting
or warpage, but I wouldn't want to jinx it, so I won't mention that.
As for playing it, I've had ups and downs. Since I have an instrument
I know better, frustration leads me away. One week a had a lot of
play dates with people and I let them know I was going to bring the new
instrument, which made me feel pretty awkward. But one place it shines
is when playing with Fendler when we do tsimbl/hurdygurdy numbers. Since
he is droning on C, and this instrument, while chromatics, makes it
easiest to find you way around in C, it is a better choice for that.
But I am still far more awkward on this instrument.
As for the bridges that are so roundly selfcritisized above, in fact
they are serving well. The real problems with those are that the alignment
of the 5/8 inch holes is not always perfect relative to the run of the
string, so there are buzzings that I minimize by tapping the bridges
up and down a bit, and the delrin rod isn't really up to the task -
it has sunk into the wood and the strings cut into it. They have very little
friction until the bend all the way down into the goove, and then it
becomes tough to get both sides of the string in tune. If and when I
redo the bridges, I will probably go with metal instead of delrin. In
fact I might want to think about doing that with the current bridges,
which are actually "holding up" nicely.
Home Page
Tsimbl Page